My strategy is pretty simple, I post my article on my wordpress blog and then cross-post it along with a canonical link on Medium, Dev.to, and Hashnode. So basically, it is the same content but it’s being shown to different audience groups.
Create Once, Publish Everywhere (COPE)
If you would like to read more about COPE, this is a great article.
I have even written a tutorial on how to automate cross-posting to various different platforms.
Blog #1 RealPythonProject Stats
This was my first wordpress blog and I created it in the Winter of 2020. I integrated it with Ezoic on 5th January 2022 and have been using Ezoic to display ads on it ever since.

In 2022, my blog got 168,402 views.
Initially, I had some trouble integrating Ezoic with my website and hence there are a few missing data points. In the month of April, a lot of my website pages became unavailable and sometime in mid-April, my entire website went down. It was due to some issues with Bluehost, my website’s hosting service. The website’s speed was affected as well and most pages were taking 15-20 seconds to load. After a bit of back and forth with the Bluehost Team, I managed to resolve the issue. However, for some reason, some of my articles got taken out of Google’s Search Index, and as a result, I had to apply to re-index multiple of my pieces.
In the last few months of 2022, my view started dropping significantly. There were a couple of reasons for it
- I started posting less content since I was pretty busy
- Google had a core Search Algorithm update in September and I believe this affected my blog. As a result, the views started tanking.
Blog #2 RealJavascriptProject Stats
I created this blog in the summer of 2022. It hasn’t grown as much as I would have liked. That is mainly because I have not been consistent in posting articles.
I don’t have Ezoic or Google Analytics setup so below is a screenshot from Jetpack Insights

In 2023, I will focus more on this blog and try monetizing it.
CrossPosting Stats
Medium
Unfortunately, there is no easy way to get yearly stats from Medium. So I’ll have to sum up the views for every month. Below is a screenshot of my best month on Medium in 2022

In 2022, I got a total of 140132 views which is almost on par with my main wordpress Blog. I had started off initially on Medium and managed to gain a few hundred followers.
I have been pretty inconsistent over the past few months but still manage to get around 10k views a month. Medium does a pretty good job at promoting your articles and a lot of top search results are often Medium articles. For anyone getting started, I highly recommend Medium as your first platform.
Dev.to
Unfortunately, Dev.to doesn’t support showing yearly stats as well. Below is a screenshot of my stats from last month

I used the Dev.to API to get my stats for 2022. My Dev.to posts got 11499 views in 2022.
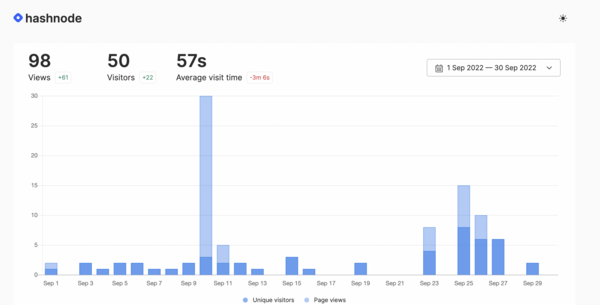
Hashnode
Unfortunately, Hashnode has not worked out for me.

IMO, Hashnode has the best UI compared to other blogging platforms and comes with a ton of features. However, I think like me, most people use it only to cross-post their articles and hence there aren’t that many readers. It is still fairly new as compared to dev.to and Medium. Or maybe I am just missing out on something. If you have managed to crack the Hashnode Algorithm and are reading this, please send me some tips.
Earnings
Now the good stuff!
Money Spent
I spent 156 USD on both my blog’s domains, hosting, etc via Bluehost.
As I talked about in the previous newsletter, I spent 175 CAD on some SEO services on Fiverr.
I used Ezoic to display ads and since June I have been paying 36 USD per month to gain access to Ezoic Premium.
Total Money Spent on Blog: ~540 USD
Ezoic Ads

The drop from August’22 was due to 3 main reasons
- The biggest reason was I decided to add hard limits on the number of ads to show per page. Initially, I did not set any ad number limits and earned around 100-200 bucks per month. However, in the long term, you need to find the sweet spot between the number of ads to display and also having a good user experience. I still haven’t managed to figure it out, Ezoic has some helpful tools for this as well.
- Lower views due to SEO issues
- Didn’t publish much during the last few months.
Medium Partner Program

Total Earnings in 2022: 980 USD
As I mentioned earlier, I only cross-post my articles on Medium. So each article of mine earns me via ads and via medium partner programs. Medium also allows you to refer users and you get a portion of the membership payment. I earn around 25 USD a month (included in the snapshot above) from referrals.
Most of my time on Medium is spent reading other writers’ work.
Guest Posts on Real Python Project
Surprisingly, a couple of people reached out to me to guest post on my blog and were willing to pay 50 USD for it. I had 4 guest posts and got 200 bucks for doing nothing other than reviewing and posting their article on my blog.
Net Income from my Blog
Total spent: 540 USD
Total earned: 2494 USD
Net Income: 1954 USD
Tips for Getting Started with Software Blogging and Making a Side Income
TLDR: Cross-posting and Posting on Sub-reddits
- Initially start by creating content on Medium and cross-posting on Dev.to/Hashnode. You will not have to deal with any SEO/Website issues and can simply focus on writing content.
- Once you have gained a few followers on any of the above platforms, consider buying a domain and publishing over there. Don’t stop cross-posting on Medium and other platforms.
- Be consistent. As you saw from my stats when you stop posting, your views and earnings drop. It’s hard to stay motivated and be consistent so you’ll have to manage your expectations for earnings. The more consistent you are, the more you will earn.
- Shamelessly promote your articles on subreddits. Just post it and forget about it. Reddit will lead to a lot of traffic to your articles.
- Write about stuff you learned at work/school or challenges you faced at work/school. Most of my articles are about challenges I faced during my day-to-day life as a developer.
About Me
If you liked this articles, please consider supporting me by buying me a Kofi. I send monthly newsletter revealing my stats/earnings for the month. If you are interested in reading more content similar to this article, subscribe to my newsletter. Read my previous issues here.
I recently graduated with a BaSc in Computer Engineering from University of Toronto. I moved to Vancouver shortly after graduation and started working as a Software Developer at Amazon. I like to play around with new APIs/ Libraries and write about them. You can connect with me on LinkedIn or Twitter
Affiliate Links
Note: If you use any of my affiliate links, I will earn some money at no extra cost to you.
The post My Software Development Blogging Journey: A 2022 Retrospective appeared first on Software Development for Everyone.]]>This Newsletter was NOT written by ChatGPT although I am not going to lie, I did try getting ChatGPT to write it. But it failed which I guess is expected.
Human: 1 — ChatGPT: 0
Last Month’s Blog Summary
1️⃣ New Articles
In November I focused more on my JavaScript Blog as compared to my Python Blog
There are a few more articles that I posted in November which have not been listed below.
How to Send and Receive Data in Flask
I’ll be using Repl.it for writing all the code. Repl.it lets you quickly deploy your API and is really convenient.
How to Store Credentials as Environment Variables and Read in JavaScript
Secrets are called secrets for a reason. We do not want others to know about them, be it in real life or in JavaScript. In this tutorial, you will learn how to store your credentials as environment variables and learn how to read them in JavaScript. We will discuss 3 different ways to store credentials […]
Understanding the this keyword in JavaScript
In JavaScript, the This keyword refers to an object that is executing the current piece of code. This is one of the most important but yet a bit confusing topics in JavaScript. In this tutorial, the following topics will be covered We will cover these topics in the tutorial and at the end of this, you […]
2️⃣ Money spent on my Blog
Ezoic Premium: 18USD ~ 25 CAD
Fiverr SEO Service: 175 CAD (Still don’t know if it was worth it or not)
3️⃣ WordPress Blog
I have two blogs
The second one is still in its early stages and doesn’t show any ads. The data below is taken from my first website.
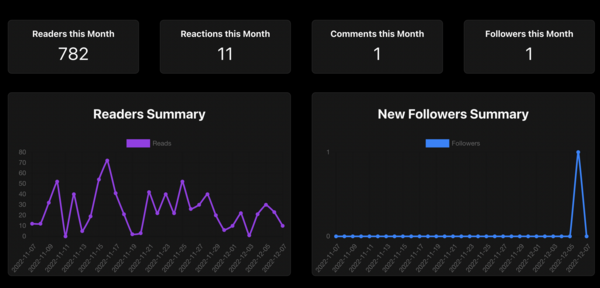
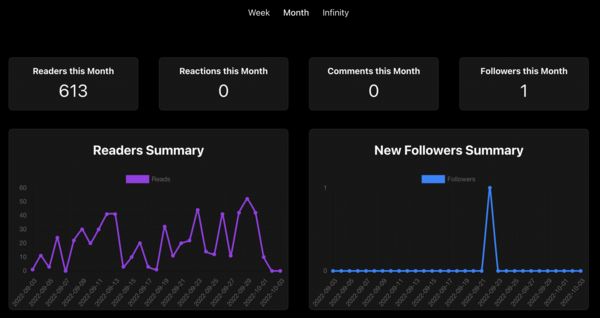
Newsletter Subscribers: 27 (No change since last month)
Kofi Payments: 0 (No change since last month)

The Blog received 11,133 Views and 10,258 Visits. According to Google Analytics, there was a drop of 1.7% in User Sessions and a 0.7% drop in Users as compared to October

In the month of November, the blog earned 83.98 USD by displaying ads. Compared to last month, this is a 16.7% increase. That’s a W!
4️⃣ Medium
Email Subscribers: 25 ( +1 in November)
Referred Members: 12 (-1 in November)

In November, I earned 59.26 USD which is a drop of 23.75% as compared to October. Now, this is an L. I haven’t been active on Medium so I guess this is expected, hopefully, December looks better!
My articles on Medium got 10,773 views and 2,590 reads in November. This is an increase of 1.48% as compared to last month. Although there was a slight increase in the number of reads, there was a decent drop in the earnings. The Medium Partner Program is pretty unpredictable.
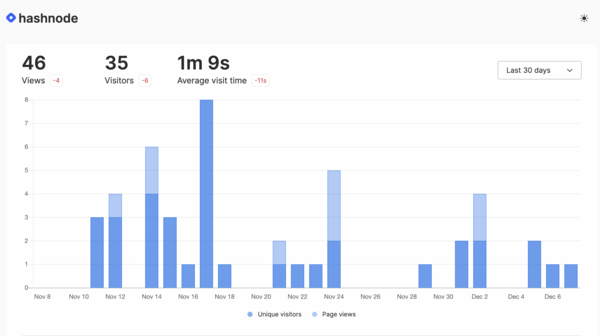
5️⃣ Dev.to and Hashnode
Neither of them earns me anything.
6️⃣ Summarizing the Summary
Total Views: 14,551 (19% decrease as compared to last month.)
Total Earnings: -56.76 CAD (Hopefully buying the SEO Gig on Fiverr was worth it)
Funny Stuff on the Internet


Cool GitHub Repos
1️⃣ Rejected.us
This is basically a collection of stories of people who got rejected. It’s mostly developers so it’s pretty relatable. I used to take a look at this frequently during my undergrad and some of the stories were really inspiring.
Below is a “tile” from the website.
You can find the web app over here
GitHub — Rejectedus/rejected.us: The codebase for rejected.us
The codebase for rejected.us. Contribute to Rejectedus/rejected.us development by creating an account on GitHub.
2️⃣ ChatGPT
Note: this is not the official ChatGPT repo.
This repo lets you interact with ChatGPT via a Python Script. As of today, I couldn’t find any API by OpenAI that lets you use ChatGPT so this repo is pretty useful. It was created by reverse-engineering ChatGPT and can be used to build cool stuff like chatbots or a Voice Assistant.
Lightweight package for interacting with ChatGPT’s API by OpenAI. Uses reverse engineered official API. — GitHub — acheong08/ChatGPT: Lightweight package for interacting with ChatGPT’s API by OpenAI. Uses reverse engineered official API.
Affiliate Links
Note: If you use any of my affiliate links, I will earn some money at no extra cost to you.
About Me
If you liked this newsletter issue or any of my articles, please consider supporting me by buying me a Kofi
I recently graduated with a BaSc in Computer Engineering from University of Toronto. I moved to Vancouver shortly after graduation and started working as a Software Developer at Amazon. I like to play around with new APIs/ Libraries and write about them. You can connect with me on LinkedIn or Twitter
The post Medium Partner Program and Ezoic Earnings for November appeared first on Software Development for Everyone.]]>Topics to be covered in this tutorial
- Set up slack
- Create a slack channel - Create a slack webhook - React project
- Environment set up - Create interface - Create webhook functionality - Output
We will cover these topics in the tutorial and at the end of this, you will be able to use webhooks in react on your own.
Set up slack
There are many web applications that provide incoming webhooks to work with them in your own application. Such as Github, discord, slack, etc. In this tutorial, we have chosen slack. It is a popular messaging application for businesses that connects people. We will create a contact form with slack webhook. To do so, we need to follow some steps.
The first step is to sign up in the slack application. If you already have signed in then you can simply log in there. All you need to do is to visit the slack application to follow the process.
Create a slack channel
If you sign up in slack for the first time, you need to create a workspace first. In our case, we named our workspace react-webhooks-demo. Now, you will get an interface where you can create different types of channels based on different purposes.

Here, you can see that, to create a channel in slack we have just followed Add channels>create a new channel>fill the name box>create this. Now we are ready to move on to the next step.
Create a slack webhook
In this step, we are going to create a slack webhook. To do so, first, we need to find the apps from slack. Sometimes, it may visible at first In case, if you could not find it, follow the below image:

You need to click on more which is just under the Threads section and finally click on the Apps. A pop-up box will appear the moment you clicked on the apps. You will find a search option there and you need to search for incoming webhooks. You will get something like the below image:

You need to click on the Add button. It will take you to another page. There you have to click on the Add To Slack button. Now, you will find an option for adding a specific channel as a webhook. See the below image:

Here, you can see that we have selected the contact-information channel that we have created before. Now, all we need to do is to click on the Add to Incoming WebHooks integration button. It will take us to a new page with the webhook URL that we are going to use in our application. See the below image:

Now, We are ready to move on to the next step where we are going to build the contact form in react and integrate the slack webhooks.
React project
We are going to create a contact form in react. To focus on the main purpose of this tutorial we are not adding anything fancy to the UI. You can imagine it with a business application where you need to contact the client in Slack. As a matter of fact, you need to integrate slack webhooks into your react application.
In the first part, we set up slack and get the webhook URL. Now, we will set up the environment of our react application in the below section.
Environment set up
Environment setup for React Application
To work in any React application, first, we need to set up the environment for it. To do so, we need to write the below command that will create a demo react app for us. See the below command:
npx create-react-app .This command will install react and its necessary packages in our specified folder. The npx create-react-app is doing all the stuff for us. We have just recognized our directory name with a “dot(.)” It will take some time to install all the packages depending on the internet connection. Make sure that you have connected your computer to the internet.
You will see some files like the below image after the installation process has been finished. This may be different from yours because we have removed some unnecessary stuff from this.
We need to install Axios which will help us to send the requests. To do so, follow the below command:
npm install axiosThis command will install the axios library for us. Now we are ready to move on to the next step.
Create interface
In this step, we will simply create a contact form. To do so, follow the below code example:
return (
    <div className='main-area'>
      <h2>Please! Provide Your Information</h2><hr></hr>
        <form>
          <label htmlFor='name'>Name</label> <br/>
          <input id="name" type="text" placeholder="Enter Your Name"/><br/><br/>

          <label htmlFor="email">Email</label> <br/>
          <input id="email" type="email" placeholder="Enter Your Email" /><br/><br/>

          <label htmlFor="message"> Message</label> <br/>
          <textarea id="message" type="message" placeholder="Write Your Message Here"/> <br/> <br/><br/>

          <button >Submit</button>
        </form>
      </div>
  );
Here, you can see that we have created a contact form that will expect the name, email, and message from the user. We have also used some basic styling to give the UI a better look. It is not important though, you can style based on your own interests. See the below output:

If we try to fill up this form and submit it, nothing will happen. The reason is we haven’t implemented any functionality yet. In the next step, we will perform this action.
Create webhook functionality
To create webhook functionality we need to go to the app.js file. Here, we will import react, Axios, and CSS files. Later on, we will use the useState functionality to hold the data. Finally, we send the request with the help of Axios. Follow the below code example to understand it more clearly:
import React, { useState } from 'react'
import axios from 'axios'
import './App.css'

function App() {
  const [name, setName] = useState('')
  const [email, setEmail] = useState('')
  const [message, setMessage] = useState('')

  async function submitForm(e) {
    e.preventDefault();

    const webhookUrl = 'Your WebHook URL'

    const data = {
      "text": `Name: ${name} \\n${email} \\n${message}`,
    }

    let res = await axios.post(webhookUrl, JSON.stringify(data), {
      withCredentials: false,
      transformRequest: [(data) => {return data}]})

    if (res.status === 200) {
      alert("Form Submitted Successfully!")

      setName('')
      setEmail('')
      setMessage('')
    } else {
      alert("Error Occurred!")
    }

  }

  return (
    <div className='main-area'>
      <h2>Please! Provide Your Information</h2><hr></hr>
        <form>
          <label htmlFor='name'>Name</label> <br/>
          <input id="name" type="text" placeholder="Enter Your Name" value={name} onChange={(e) => { setName(e.target.value)}}/><br/><br/>

          <label htmlFor="email">Email</label> <br/>
          <input id="email" type="email" placeholder="Enter Your Email" value={email} onChange={(e) => { setEmail(e.target.value)}}/><br/><br/>

          <label htmlFor="message"> Message</label> <br/>
          <textarea id="message" type="message" placeholder="Write Your Message Here" value={message} onChange={(e) => { setMessage(e.target.value)}}/> <br/> <br/><br/>

          <button onClick={(e) => submitForm(e)}>Submit</button>
        </form>
      </div>
  );
}

export default App
Here, you may notice we have stored the webhook URL into a variable. Here, you have to put the webhook URL that you have got from the slack incoming WebHooks. After submitting the data, we also clear the text from the input field and showed a successful message. If anything went wrong, it will show the error message also.
Output
Now, it is time to test our application to check whether it is working perfectly or not. To do so, first, we need to run our application. we can do it by npm start command in our terminal.

Here, you can see that we have put some information in our contact form and clicked on the submit button. This information should appear on slack’s contact-information channel. Let’s open slack and visit the channel to see whether is there any changes occurring or not.

Here, you can see that the exact information has been shown on our channel. That means, we successfully integrated slack webhook in our react application. Now, if you need to deploy this you can use vercel or ngrok for quick deployment. Finally, this is all about working with webhooks in react.
The post How to use Slack’s Incoming Webhooks in React appeared first on Software Development for Everyone.]]>Before moving forward, let’s set up our environment and get the required API keys.
Create a node project and install axios using the following command
npm i axiosWe will be working with the Cat as a Service (CAAS). You can signup for free to get an API Key. If you are interested in learning how to deal with local credentials and javascript, check out this tutorial.
The below code snippet simply makes a couple of requests
const axios = require('axios')
CAT_API_KEY = process.env.CAT_API_KEY

// Request 1
axios.get(
  "https://api.thecatapi.com/v1/images/search",{
    headers: { 'x-api-key' : CAT_API_KEY }
  }
)
.then(
  res=>res
)
.then(
  res=> console.log(res.data)
)
.catch(
  e=>console.log(e)
)

// Request 2
axios.post(
  "https://api.thecatapi.com/v1/votes",
  {"image_id":"7d9", "value": -1},
  { headers: { 'x-api-key' : CAT_API_KEY } }
)
.then(
  res=>res
)
.then(
  res=> console.log(res.data)
)
.catch(
  e=>console.log(e)
)
In both requests, we need to pass a headers object with the API Key and also type the entire API Endpoint.
axios.create can help us by creating a session-like object. You simply define your headers, your API Base URL, and other configuration once. It will create an instance of axios that can be used to make the requests. You can read more about axios.create here
const CAT_API_CLIENT = axios.create({
  baseURL: 'https://api.thecatapi.com/v1/',
  timeout: 1000,
  headers: { 'x-api-key' : CAT_API_KEY }
});

// Request 1
CAT_API_CLIENT.get("images/search")
.then(
  res=>res
)
.then(
  res=> console.log(res.data)
)
.catch(
  e=>console.log(e)
)

// Request 2
CAT_API_CLIENT.post("votes",
  {"image_id":"7d9", "value": -1}
)
.then(
  res=>res
)
.then(
  res=> console.log(res.data)
)
.catch(
  e=>console.log(e)
)
We use axios.create to create a client object. For both requests, we no longer need to pass a headers object. You can configure your client by adding more headers or configuring other parameters.
axios.create is particularly helpful when you are working with multiple APIs. You can simply create clients for each API and use those clients.
const CAT_API_CLIENT = axios.create({
  baseURL: 'https://api.thecatapi.com/v1/',
  timeout: 1000,
  headers: { 'x-api-key' : CAT_API_KEY }
});

const GITHUB_CLIENT = axios.create({
  baseURL: 'https://api.GitHub.com/',
  timeout: 1000,
  headers: {
    'Accept': 'application/vnd.GitHub.v3+json',
    'Authorization': GITHUB_API_KEY
  }
});

const DISCORD_CLIENT = axios.create({
  .....
})
As you can see it using axios.create reduces redundant code and makes it more organized.
This keyword refers to an object that is executing the current piece of code. This is one of the most important but yet a bit confusing topics in JavaScript. In this tutorial, the following topics will be covered
- Implicit Binding
- Explicit Binding
CallApplyBind
- How does
thiswork with theNewkeyword? - Window Object
- How does
thiswork with Arrow function?
We will cover these topics in the tutorial and at the end of this, you will be able to understand This keyword in JavaScript completely.
Implicit Binding
The first rule of This keyword in JavaScript is implicit binding. This rule will cover most of the usage of This keyword. We already know that This keyword only deals with the Object and we can access the Object’s property with a dot(.) notation. The implicit binding follows two rules.
The first rule is to find out where the function has been called and the second one is to check whether there is any dot notation before that function or not. If there’s any then the left side of the dot notation Object will become This. Let’s see the following example to understand it more clearly.
const Student = {
    name : 'Rahul',
    age : 25,
    printStudentName : function (){
        console.log(this.name)
    }
}

Student.printStudentName()

// Output: Rahul
This is a basic example of implicit binding. But how do we know that? Remember! the two rules of implicit binding?
Here, you can see that we have called the function at the end of the student object. Besides, there’s a dot notation before that function and it indicates an Object named Student. In this case, This which is used in the printStudentName method is mainly indicating the Student Object itself by following the implicit binding rules. Follow the below code example to verify this statement.
const Student = {
    name : 'Rahul',
    age : 25,
    printStudentName : function (){
        console.log(this)
        console.log(this.name)
    }
}

Student.printStudentName()

/*
Output:
{
  name: 'Rahul',
  age: 25,
  printStudentName: [Function: printStudentName]
}
Rahul
*/
Here, you can see that we have printed This first and in the output, it shows all of the properties of the Student object. As we know, we can access any properties of an Object by using the dot(.) notation. We access the name of the Student object by applying this.name.
Explicit Binding
This keyword is used in JavaScript to reuse a function on the basis of a context. When a function is declared on the global scope and needs to use inside an Object, we can not perform it by following explicit binding. Explicit binding is nothing but defining an Object as This keyword manually. JavaScript provides three functions to perform this action and these are- call(), apply(), and bind(). Let’s see an example of call() in the below section:
Call() Function
const printStudentName = function (v1, v2, v3){
    console.log(this)
    console.log(`${this.name} is ${v1}, ${v2} and ${v3}`)
}

const Student = {
    name : 'Rahul',
    age : 25
}

const v1 = 'Brilliant'
const v2 = 'Attentive'
const v3 = 'Industrious'

printStudentName.call(Student, v1, v2, v3)

/*
{ name: 'Rahul', age: 25 }
Rahul is Brilliant, Attentive and Industrious
*/
Here, you can see that we are defining which Object will be referred to as This keyword explicitly with the help of the call() function. Inside the parameter of the call function, we pass the Object name and some other parameter as the virtue of the student. As a result, we can easily access all the properties of this Object by using This keyword inside the printStudentName() function.
Apply() Function
The call() function does not able to take an Array along with the Object as the parameter. But what if you need to pass an array? Here, apply() function comes to play its role. See the below code example:
const printStudentName = function (v1, v2, v3){
    console.log(this)
    console.log(`${this.name} is ${v1}, ${v2}, and ${v3}`)
}

const Student = {
    name : 'Rahul',
    age : 25
}

const v1 = 'Brilliant'
const v2 = 'Attentive'
const v3 = 'Industrious'

const arr = [v1, v2, v3]

printStudentName.apply(Student, arr)

/*
{ name: 'Rahul', age: 25 }
Rahul is Brilliant, Attentive, and Industrious
*/
Here, you can see that this function behaves exactly the same as the call() function. But it gives us an extra feature to pass an array as the parameter.
Bind() Function
The bind() function behaves exactly like the call() function but the only difference is it creates an instance of the function instead of calling the function itself. Follow the below code example to understand it more clearly.
const printStudentName = function (v1, v2, v3){
    console.log(this)
    console.log(`${this.name} is ${v1}, ${v2} and ${v3}`)
}

const Student = {
    name : 'Rahul',
    age : 25
}

const v1 = 'Brilliant'
const v2 = 'Attentive'
const v3 = 'Industrious'

const anotherFunc = printStudentName.bind(Student, v1, v2, v3)

anotherFunc()

/*
{ name: 'Rahul', age: 25 }
Rahul is Brilliant, Attentive and Industrious
*/
Here, the bind() function creates an instance of the function and stores it inside the anotherFunc. As a result, we need to call anotherFunc() to see the results.
New Binding
This keyword indicates a particular object that is created by a new keyword. Let’s imagine a constructor function that refers to a Students name and age. Now if we create an object with the new keyword then This keyword will refer to it. See the below code example:
function Student(name, age){
    this.name = name,
    this.age = age
    console.log(`${this.name} is ${this.age} years old.`)
}

const rahul = new Student('Rahul', 25)

// Output: Rahul is 25 years old.
Here, when we used the new keyword, JavaScript by default creates an Object named This and returns that Object. Now, when we used Rahul the This keyword simply identifies Rahul as This.
Window Binding
When the above three rules are not able to point to This keyword, then it will point to the window. In other words, This will refer to the Window Object by default. See the below code example:
const printName = function(){
    console.log(this.name)
    console.log(this)
}

const Rahul = {
    name : 'Rahul'
}

printName()

/*
Output:
undefined
Window {window: Window, self: Window, document: document, name: '', location: Location, …}
<ref *1> Object [global] …}
*/
Here, you can see that This keyword does not follow the above three rules. As a result, we assume that it will bind to the window object. To check this, we print This. In the output, it shows the window for the browser and the global for the NodeJS. None of them contains a name property. So, when we try to print this.name it simply shows us undefined.
This behaviour of This keyword may often create confusion. Especially, when the code base becomes large. If we do not want this unwanted situation then we can simply use the use strict mode. See the below code example:
'use strict'

const printName = function(){
    console.log(this.name)
    console.log(this)
}

const Rahul = {
    name : 'Rahul'
}

printName()

// Output: TypeError: Cannot read properties of undefined (reading 'name')
Now, you can see that we are getting an error with a clear error message instead of getting undefined. This will help us to debug the code.
Arrow function
This keyword will behave completely differently when it comes to the Arrow function. The semantics of the Arrow function is different from the traditional functions of JavaScript. In the Arrow function, This will not be redefined. Instead, it will always represent the parent object. Let’s see the below code example without using the Arrow function.
const Student = {
    name : 'Rahul',
    printName: function () {
        console.log(`My name is ${this.name}`)
    },
}

Student.printName()

// Output: My name is Rahul
Here, you can see that we are getting the output with the name. The reason for this is that This keyword is indicating the Student object and the name is returned through the implicit binding. Now, what will happen if we use the Fat Arrow function instead of the traditional function? Let’s see the below code example:
const Student = {
    name : 'Rahul',
    printName:  () => {
        console.log(`My name is ${this.name}`)
    },
}

Student.printName()

// Output: My name is undefined
As expected, we are getting undefined instead of the name. The Arrow function does not have any execution context, as a result, it refers to the global Object or its Parent object. For this reason, the parent object print undefined.
Conclusion
I hope your found this tutorial helpful. The this keyword is pretty confusing and the only way to truly understand how it works is to try out the cases mentioned above and console.log() the value of this in the different cases. If you found this article helpful, you might find the article on Currying, Callback and Closure helpful as well.
- Storing them as Global Environment Variables
- Providing them as a Command Line Argument
- Storing them in a .env file
- Which is the best way to Read Credentials Locally in Javascript?
If you are interested in a similar tutorial for python, you can check out this article
Storing Credentials as Global Environment Variables
If the credentials are stored as Global Environment Variables, they can be accessed by any script running on your PC.
To Create a Global Environment Variable, run this in your terminal
export varName=varValueEnsure there are no spaces between the ‘=’. If you get an error
“zsh: Bad Assignment”or
bash: export: `=': not a valid identifierit is probably caused because of space between the ‘=’.
Let’s create a couple of global environment variables
export globalUser=secretUser
export globalKey=secretKey
In Windows, you might have to use “set” instead of “export”.
Below is how you would access the variables in Node
const USER= process.env.globalUser
const KEY = process.env.globalKey

console.log(USER) // secretUser
console.log(KEY) // secretKey
process.env returns an object with all your Global Environment Variable.
You do not need to install any npm library since process is a built-in library in Node. The biggest con of Global Environment Variables is that you risk overwritting previously existing variables. As time goes by, it will be hard to keep track of previously created variables and avoid overwriting.
If you want to remove the environment variable you created earlier
unset globalUser
unset globalKey
Providing Credentials as Command Line Arguments
If you want to pass your credentials in the command line
globalUser=secretUserglobalKey=secretKeynode app.js
You could access them in Node the same you way you accessed the global environment variables
const USER= process.env.globalUser
const KEY = process.env.globalKey

console.log(USER) // secretUser
console.log(KEY) // secretKey
A caveat to doing something like this is that you will have to remember to pass the credentials as command-line arguments each time you run your script.
Storing Credentials in a .env file

You can create a file named .env and store your credentials over there. Although you can store your credentials in any file and read them from your file, conventionally credentials are stored in .env files.
globalUser=secretUser
globalKey=secretKey
.env files are usually used to store secrets and credentials. Make sure to add it to your .gitignore file so that you don’t commit it by mistake.
To read variables from an .env file you will have to install dotenv which is a npm package.
npm install dotenv --savedotenv can be installed as a dev dependency since it will only be used during development to load variables from .env files.
Below is the code to read the variables from the env file
require('dotenv').config()

const USER= process.env.globalUser
const KEY = process.env.globalKey

console.log(USER) // globalUser
console.log(KEY) // globalKey
As you can see most of the code is same as before. The only addition being the require statement at top.
Which is the best way to Read Credentials Locally in Javascript?
In my opinion, the best way is to store them inside a .env file.
- They are local to your project
- You do not need to worry about ‘unsetting’ them.
- If you add them to your .gitignore file, it is safe from the outside world
The only con is that if there is a Global Environment Variable with the same name as a variable in the .env file, process.env will return the Global Environment Variable.
Last Month’s Blog Summary
New Articles
Do you know about Pokemon Exception Handling or Yoda Conditions? This article talks about it
I wrote a couple of articles. The first article was pretty interesting, if you have some time I hope you read it. It talks about some peculiar/funny Programming Lingo. It has a total of around 4k views since I posted it. I managed to get quite a few views by posting the link on various subreddits
WordPress Blog
I have two blogs
The second one is still in its early stages and doesn’t show any ads. The data below is taken from my first website.
Newsletter Subscribers: 27 (No change since last month)
Kofi Payments: 0 (No change since last month)

The blog received 11,330 views from 10,377 visits. According to Google Analytics, there was a 20ish% drop is traffic in October. Maybe some new algorithm update?

In the month of October, the blog earned 71.93USD by displaying ads. Compared to last month, this is a 6% increase. Although the traffic dropped, there was a slight increase in earnings. I’ll take that as a W 
Email Subscribers: 24 ( +2 in October)
Referred Members: 13 (+1 and -1 so effectively no change)

On Medium, I earned 77.72 USD. Compared to the last month, this is a 3.8% increase.
My articles on Medium got 10,564 views and 2,552 reads in October. I am not sure what ‘views’ means in Medium, I give more importance to the ‘reads. Compared to last month, it’s a decrease of 8.5%.
Neither of them earns me anything.


Summarizing the Summary
Total Views: 17,951 views (12% Increase compared to last month — mainly cause of Dev.to)
Total Earnings: 149.65 USD(5% Increased compared to last month)
Funny Stuff on the Internet


Don’t ever try to disturb working code…

Cool GitHub Repos
1. Pokemon Cards CSS
I might be biased since I am a Pokemon fan but honestly this is pretty cool. Check out their website
2. Clones of Popular Websites
If you are looking to beef up your portfolio, this repo is for you. It contains a list of clones of popular websites. A few of them even have tutorials on how to build the clones.
About Me
If you liked this newsletter issue or any of my articles, please consider supporting me by buying me a Kofi
I recently graduated with a BaSc in Computer Engineering from University of Toronto. I moved to Vancouver shortly after graduation and started working as a Software Developer at Amazon. I like to play around with new APIs/ Libraries and write about them. You can connect with me on LinkedIn or Twitter
The post Medium Partner Program and Ezoic Earnings for October appeared first on Software Development for Everyone.]]>nvm. You’ll also see how to install/uninstall different node versions and switch between them.
Node has a lot of different versions. If you are working with multiple projects, there is a good chance you will need a tool to switch between node versions easily. One such tool is nvm.
Note this tutorial is for Linux/Mac. If you are using Windows, you should check out this repository.
Installing NVM
Install NVM using one of the below commands depending on whether you use curl or wget
| wget -qO- https://raw.githubusercontent.com/nvm-sh/nvm/v0.39.1/install.sh|bash |
or
| curl -o- https://raw.githubusercontent.com/nvm-sh/nvm/v0.39.1/install.sh|bash |
After installation try running the following command
nvm --versionIf you see an output, it means nvm has been successfully installed. If you get an error that the command can not be found, you will need to add it to your zsh/bash profile manually.
Open your .zshrc / .bashrc file
nano ~/.zshrcPaste the following at the end
| export NVM_DIR="$HOME/.nvm" | |
| [ -s "$NVM_DIR/nvm.sh" ] && \. "$NVM_DIR/nvm.sh" # This loads nvm | |
| [ -s "$NVM_DIR/bash_completion" ] && \. "$NVM_DIR/bash_completion" # This loads nvm bash_completion |
Restart your zsh / bash terminal
source ~/.zshrcInstalling a version of Node
nvm install <version_number>If I wanted to install Node 14, I’d run the following command
nvm install 14You can also install a specific patch version.
List All available versions of Node
nvm ls-remoteSwitch Between Versions of Node
nvm use <version_number>If I wanted to switch to Node 14, I’d run the following
nvm use 14Aliases
Check the current version set to an alias
nvm alias <alias_name>For example, if you want to check your current default version
nvm alias defaultAnother useful alias is node. It is an alias for the current stable version installed on your machine.
If you want to set your default to Node 14, run the following
nvm alias default 14List the Current Version of Node
nvm currentUninstall a Version of Node
nvm uninstall <version_number>Run a Script using a Specific Version of Node
nvm run <version_number> <script.js>If you like this article and are interested in signing up for my personal Newsletter, click the link below. I will send an email once a month — No Spam!
Rahul Banerjee’s Newsletter  — Revue
Issue #1 — RealPythonProject September Recap
This will be my first newsletter and as they say — “first impression is your last impression”. Quite literally when it comes to newsletters so I will try to keep this interesting.
Last Month’s Blog Summary
Why share my earnings and stats? To be honest, I don’t know. I find it interesting reading about other bloggers’/freelancers’ stats and earnings. Maybe this motivates you or maybe you are just curious like me. Either way, I hope you find it interesting.
New Articles
I published the following article and honestly it tanked. In total it only got around 15 reads on Medium and around 10 reads on my WordPress Blog. Below is the article
How to Use Python to Post on Popular Blogging Websites
Create once, publish multiple times. Automate the manual work with Python . We will use the various APIs…www.realpythonproject.com
WordPress Blog
I have two blogs
The second one is still in its early stages and doesn’t show any ads. The data below is taken from my first website.
Newsletter Subscribers: 27
Kofi Payments: 0 (When I created the account, I was being very optimistic and hoping someone would donate Lol)

The blog received 12,501 views from 11,462 visits. The data is taken from Ezoic so it’s usually under-reported. According to Google Analytics, the blog received around 13k views.

I earned 67.68 USD by displaying Ezoic Ads on the website. Previously I was spamming my blog with ads and earning around 150 USD — 200 USD per month but I decided to reduce the number of ads to improve the user’s experience in hopes that they end up reading the entire article and subscribing to the newsletter.
Medium
Email Subscribers: 22 ( +2 in September)
Referred Members: 13 (No Change in September)
I earned 74.87 USD in the month of September.

I am not sure what ‘views’ means in Medium, I give more importance to the ‘reads. I got around 2,770 reads last month. It

Dev.to and Hashnode
Neither of them earns me anything.
Summarizing the Summary
Total Views: 15982 views
Total Earnings: 142.55 USD ~ 196.02 CAD
As a developer, do you understand these Memes?
If you have spent some time on tech Twitter, you should get the reference in the title.

Cool GitHub Repos
1. PRegEx
Regex is a pain but this repo lets you generate Regex using easy-to-remember Python Syntax
GitHub — manoss96/pregex: PRegEx — Programmable Regular Expressions
2. Software Developer Folio
Use this repo to finally build your Portfolio. The thought of starting to build my portfolio from scratch made me procrastinate. Luckily repos with portfolio templates like these exist. It reduced a lot of the required effort.
GitHub — saadpasta/developerFolio:  Software Developer Portfolio Template that helps you showcase…
About Me
I recently graduated with a BASc in Computer Engineering from the University of Toronto. I moved to Vancouver shortly after graduation and started working as a Software Developer at Amazon. I like to play around with new APIs/ Libraries and write about them. You can connect with me on LinkedIn or Twitter
The post Medium Partner Program and Ezoic Earnings for September appeared first on Software Development for Everyone.]]>Create, Read, Update and Delete and it is the most basic operation of a web application. The create function allows the client to create a new record whereas the read function allows the client to get particular data. The other function named update is used to update the data and finally, the delete function is used to delete the data. This operation is the fundamental base that is widely used in web applications.
In this tutorial, We are going to create a simple Contact list where a user can create a contact, see the created contact, edit it and delete it. If you notice, then you may be able to see that, by performing these actions we are completing the four functions of CRUD and at the end of this tutorial you can perform CRUD operations on your own in React Moreover, this tutorial is going to help you to connect the dots of your fundamental concepts in React that you have learned previously.
Prerequisite
Before jumping into the main section of this tutorial, you need to keep these below things in your mind.
- A configured computer with an internet connection.
- Basic knowledge of JavaScript, HTML, and CSS.
- A text editor – You can choose any text editor on which you may write JavaScript code such as sublime text, nodepad++, etc. In this tutorial, we will use visual studio code.
- Installed NPM on your computer. We are using NPM version v8.7.0.
- Clear concept on fundamental topics of ReactJS.
Having these things will bring the best outcome from the tutorial for you. Let’s see the topics that will be covered in this tutorial.
Things You will learn from this tutorial
We will cover the following topics in this tutorial and the topic’s names are given in the below section:
- Environment setup for React Application
- Create Add Contact Functionality
- Create Get Contact Functionality
- Create Edit Contact Functionality
- Create Delete Contact Functionality and Context
- Create different Routes
- Output
Environment setup for React Application
To work in any React application, at first we need to set up the environment for it. To do so, we need to write the below command that will create a demo react app for us. See the below command:
npx create-react-app .
This command will install react and its necessary packages in our specified folder. The npx create-react-app is doing all the stuff for us. We have just recognized our directory name with a “dot(.)” It will take some time to install all the packages depending on the internet connection. Make sure that you have connected your computer to the internet.
You will see some files like the below image after the installation process has been finished. This may be different from yours because we have removed some unnecessary stuffs from this.

We need to install a few more packages to work smoothly in this application. Such as react-router for handling routes and bootstrap and reactstrap for styling. uuid for generating a unique id. To install these follow the below commands:
npm i uuid react-router-dom reactstrap bootstrap
Now, we are ready to make our hands dirty with the code. In the next section, we are going to implement our CRUD application features one by one.
Create Add Contact Functionality
In this stage, we will create the functionality for adding new Contact. To perform this action, we will create a folder named components first and inside that folder, we will create a component file named AddContact.js See the below code example first:
import React, { useState, useContext } from 'react';
import { GlobalContext } from "../context/GlobalState";
import { v4 as uuid } from "uuid";
import { Link, useNavigate } from "react-router-dom";
import {
  Form,
  FormGroup,
  Label,
  Input,
  Button
} from "reactstrap";

export const AddContact = () => {
  const [name, setName] = useState('');
  const { addContact } = useContext(GlobalContext);
  const navigate = useNavigate();

  const onSubmit = (e) => {
    e.preventDefault();
    const newContact = {
      id: uuid(),
      name
    }
    addContact(newContact);
    navigate("/");

  }

  const onChange = (e) => {
    setName(e.target.value);
  }

  return (
    <Form onSubmit={onSubmit}>
      <FormGroup>
        <Label>Contact No:</Label>
        <Input type="text" value={name} onChange={onChange} name="name" placeholder="Enter Contact" required></Input>
      </FormGroup>
      <Button type="submit">Save</Button>
      <Link to="/" className="btn btn-danger ml-2">Delete</Link>
    </Form>
  )
}
Here, you can see that we have used uuid to generate a unique id the moment a new contact list has been created. We have used useState and useContext to hold the state of the data so that we can change them later. We have also created a GlobalContext file where we handle the context globally. We will see the implementation later.
Finally, in the returned function, we have used these functions in the input field and a button to save the contact. Let’s implement the Get contact functionality in the next section.
Create Get Contact Functionality
In this stage, we will handle the Get contact functionality which is the second function of the CRUD operation. That means we will read our created data. To do so, we will create a component file inside the components folder and name it ContactList.js After creating the file, we will write our code. See the below code example for it:
import React, { useContext } from 'react';
import { GlobalContext } from "../context/GlobalState";
import { Link } from "react-router-dom";
import {
  ListGroup,
  ListGroupItem,
  Button
} from "reactstrap";

export const ContactList = () => {
  const { contacts, removeContact } = useContext(GlobalContext);

  return (
    <ListGroup className="mt-4">
      {contacts.length > 0 ? (
        <>
          {contacts.map(contact => (
            <ListGroupItem className="d-flex" key={contact.id}>
              <strong>{contact.name}</strong>
              <div className="ml-auto">
                <Link to={`/edit/${contact.id}`} color="warning" className="btn btn-warning mr-1">Edit</Link>
                <Button onClick={() => removeContact(contact.id)} color="danger">Delete</Button>
              </div>
            </ListGroupItem>
          ))}
        </>
      ) : (
          <h4 className="text-center">No contacts</h4>
        )}
    </ListGroup>
  )
}
Here, at first, we have imported the GlobalContext file from the context folder, and later on, simply check if our length of the contact list is greater than 0 or not. If it is greater than 0 that means there’s some data has been stored. All we need to do is to read that data. To do so, we simply perform a map operation and show our data in the output nicely. If it does not find any data then it simply shows us a No Contacts message.
We have also implemented the functionality of Delete contact here.
Create Edit Contact Functionality
After visualizing the data, now it’s time to create an Edit functionality in our application. To perform this action, like before, we will create a component file in our components folder and name it EditContact.js See the below code example of the implementation:
import React, { useState, useContext, useEffect } from 'react';
import { GlobalContext } from "../context/GlobalState";
import { Link, useNavigate } from "react-router-dom";
import {
  Form,
  FormGroup,
  Label,
  Input,
  Button
} from "reactstrap";

export const EditContact = (props) => {
  const { EditContact, contacts } = useContext(GlobalContext);
  const [selectedContact, setSelectedContact] = useState({
    id: '',
    name: ''
  })
  const navigate = useNavigate();
  const currentContactId = props.id

  useEffect(() => {
    const contactId = currentContactId;
    const selectedContact = contacts.find(contact => contact.id === contactId);
    setSelectedContact(selectedContact);
  }, [currentContactId, contacts])

  const onChange = (e) => {
    setSelectedContact({ ...selectedContact, [e.target.name]: e.target.value })
  }

  const onSubmit = (e) => {
    e.preventDefault();
    EditContact(selectedContact);
    navigate("/")
  }

  return (
    <Form onSubmit={onSubmit}>
      <FormGroup>
        <Label>Contact No</Label>
        <Input type="text" onChange={onChange} name="name" placeholder="Enter Contact" required></Input>
      </FormGroup>
      <Button type="submit">Edit Contact</Button>
      <Link to="/" className="btn btn-danger ml-2">Cancel</Link>
    </Form>
  )
}
Here, the user will want to update a single data at a single time. But we don’t know which data the user wants to update. To do so, at first we have caught the id number that a user wants to change and then implement the functionality for updating.
We have also cross-checked whether the id number that a user has been provided already exists in our program or not. If it matches then simply let the user change the data otherwise not. We have also set this field required so that the user does not keep it empty.
Create Delete Contact Functionality and Context
We have implemented the delete functionality while creating the get contact functionality. You do not need to do an extra thing for this. But if you notice, you may be able to see that, almost every place we have used the GlobalContext because of holding our Data. Let’s see the implementation of these.
To do so, we have created a separate folder into our src folder and named it the context folder. Let me assume that you have already known about the term context in react. In this tutorial, we will not explain it.
In the context folder, we have created two files named AppReducer.js and GlobalContext.js See the implementation of them in the below code example:
// App Reducer
// eslint-disable-next-line import/no-anonymous-default-export
export default (state, action) => {
    switch (action.type) {
        case 'REMOVE_CONTACT':
            return {
            ...state,
            contacts: state.contacts.filter(user => {
                return user.id !== action.payload;
            })
        }
        case 'ADD_CONTACT':
            return {
            ...state,
            contacts: [action.payload, ...state.contacts]
        }
        case 'EDIT_CONTACT':
            const updateContact = action.payload;

            const updateContacts = state.contacts.map(contact => {
            if (contact.id === updateContact.id) {
            return updateContact;
            }
            return contact;
        })
            return {
            ...state,
            contacts: updateContacts
        }

        default:
            return state;
        }
    }
// Global Context
import React, { createContext, useReducer } from 'react';
import AppReducer from './AppReducer';

// Initial State
const initialState = {
  contacts: []
}

// Create Context
export const GlobalContext = createContext(initialState);

// Provider Component
export const GlobalProvider = ({ children }) => {
  const [state, dispatch] = useReducer(AppReducer, initialState);

  // Actions
  const removeContact = (id) => {
    dispatch({
      type: 'REMOVE_CONTACT',
      payload: id
    })
  }

  const addContact = (contact) => {
    dispatch({
      type: 'ADD_CONTACT',
      payload: contact
    })
  }

  const editContact = (contact) => {
    dispatch({
      type: 'EDIT_CONTACT',
      payload: contact
    })
  }

  return (
    <GlobalContext.Provider value={{
      contacts: state.contacts,
      removeContact,
      addContact,
      editContact
    }}>
      {children}
    </GlobalContext.Provider>
  )
}
Create different Routes
After implementing all of these, now it’s time to handle separate routes for each of our components. We will perform this action in our App.js file which is considered the main entry point of our application. See the below code example of performing this action:
import React from 'react';
import { BrowserRouter as Router, Route, Routes } from "react-router-dom";
import { Home } from "./components/Home";
import { AddContact } from "./components/AddContact";
import { EditContact } from "./components/EditContact";
import { GlobalProvider } from "./context/GlobalState";

import "bootstrap/dist/css/bootstrap.min.css";

const App = () => {
  return (
    <div style={{ maxWidth: "30rem", margin: "4rem auto" }}>
      <GlobalProvider>
        <Router>
          <Routes>
            <Route exact path="/" element={<Home/>} />
            <Route path="/add" element={<AddContact/>} />
            <Route path="/edit/:id" element={<EditContact/>} />
          </Routes>
        </Router>
      </GlobalProvider>
    </div>
  )
}

export default App
Here, you can see that we have imported all our Components and used them with the help of Routes. Our program is ready. Let’s check the output in the next section to see whether all our functions work perfectly or not.
Output
To see the output, at first, we need to give the npm start command in our terminal. It will open our application on port 3000 by default. Let’s start with creating a new contact:

Here, you can see that we are in the add contact route and we write some numbers as a contact and click on the save button. It will save for us and we may see it in our home route.
We have linked the home route with the get contact list route. So, if we visit localhost:3000/ we will be able to see the created contact list.

As expected, you can see the contact list. Let’s edit it by clicking the edit button in the below section:

Here, you can see that the moment we have clicked on the Edit button it takes us to a different route that consists a Unique id. we have edited the contact with some zeros. let’s click on the edit Contact route and see what happens.

You can see that our previous contact has been updated with all zeros. Now let’s test the delete functionality in the below section:

Here, you can see that our contact has been deleted the moment we have clicked on the delete button and No contacts message has been shown as there is no contact exits.
We have successfully perform the CRUD operation in our React application. This is all about the project and by following this tutorial you may create you our CRUD application with React.
The post How to perform CRUD operation in React appeared first on Software Development for Everyone.]]>